Contents
Creating Transport Layer Security Client Certificates for libvirt
In our example scenario we have two Virtualisation Host Servers being set up for TLS communication, along with an Administrative desktop used to perform virtualisation management functions.
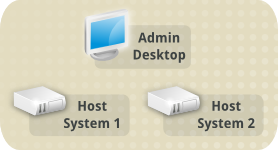
We also have the Certificate Authority Certificate and its private key created in a previous step.
In this step we create the TLS Client Certificates for both hosts and the administrative desktop, allowing them to communicate using TLS connections.
Create the Client Certificates
This can be done wherever you have both the Certificate Authority Certificate file, and its private key.
We use the utility certtool, from the gnutls-utils package for many parts of this.


Create the Client Certificate Template files using a text editor
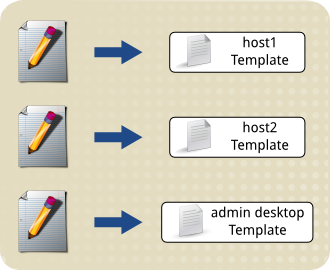
These are plain text files, one for each virtualisation client, containing the following fields:
country = Country
state = State
locality = City
organization = Name of your organization
cn = Client Host Name
tls_www_client
encryption_key
signing_key
The Name of your organization field should be adjusted to suit your organization, the location related fields need to be updated, and the Client Host Name field must be changed to match the host name of each client.
For our example scenario, we have three files:
# ls -al *client_template.info
-rw-r--r--. 1 root root 141 Aug 26 13:21 admin_desktop_client_template.info
-rw-r--r--. 1 root root 134 Aug 26 13:20 host1_client_template.info
-rw-r--r--. 1 root root 134 Aug 26 13:20 host2_client_template.info
# cat host1_client_template.info
country = AU
state = Queensland
locality = Brisbane
organization = libvirt.org
cn = host1
tls_www_client
encryption_key
signing_key
# cat host2_client_template.info
country = AU
state = Queensland
locality = Brisbane
organization = libvirt.org
cn = host2
tls_www_client
encryption_key
signing_key
# cat admin_desktop_client_template.info
country = AU
state = Queensland
locality = Brisbane
organization = libvirt.org
cn = admindesktop
tls_www_client
encryption_key
signing_key
Create the Client Certificate Private Key files using certtool
Generate the private key files, to be used with the Client Certificates.
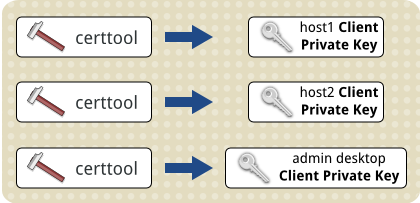
These keys are used to create the TLS Client Certificates, by each virtualisation host when the virtualisation system starts up, and by the administration desktop each time the virtualisation tools are used.
We create a unique private key for each client, also ensuring the permissions only allow very restricted access to these files:
# (umask 277 && certtool --generate-privkey > host1_client_key.pem)
Generating a 2048 bit RSA private key...
# (umask 277 && certtool --generate-privkey > host2_client_key.pem)
Generating a 2048 bit RSA private key...
# (umask 277 && certtool --generate-privkey > admin_desktop_client_key.pem)
Generating a 2048 bit RSA private key...
# ls -al *_client_key.pem
-r--------. 1 root root 1675 Aug 26 13:26 admin_desktop_client_key.pem
-r--------. 1 root root 1675 Aug 26 13:26 host1_client_key.pem
-r--------. 1 root root 1679 Aug 26 13:26 host2_client_key.pem
NOTE - The security of these private key files is very important.
If an unauthorised person obtains one of these private key files, they could use it with a Client Certificate to impersonate one of your virtualisation clients. Depending upon your host configuration, they may then be able to perform administrative commands on your host servers. Use good unix security to restrict access to the key files appropriately.
Combine the template files with the private key files, to create the Client Certificates
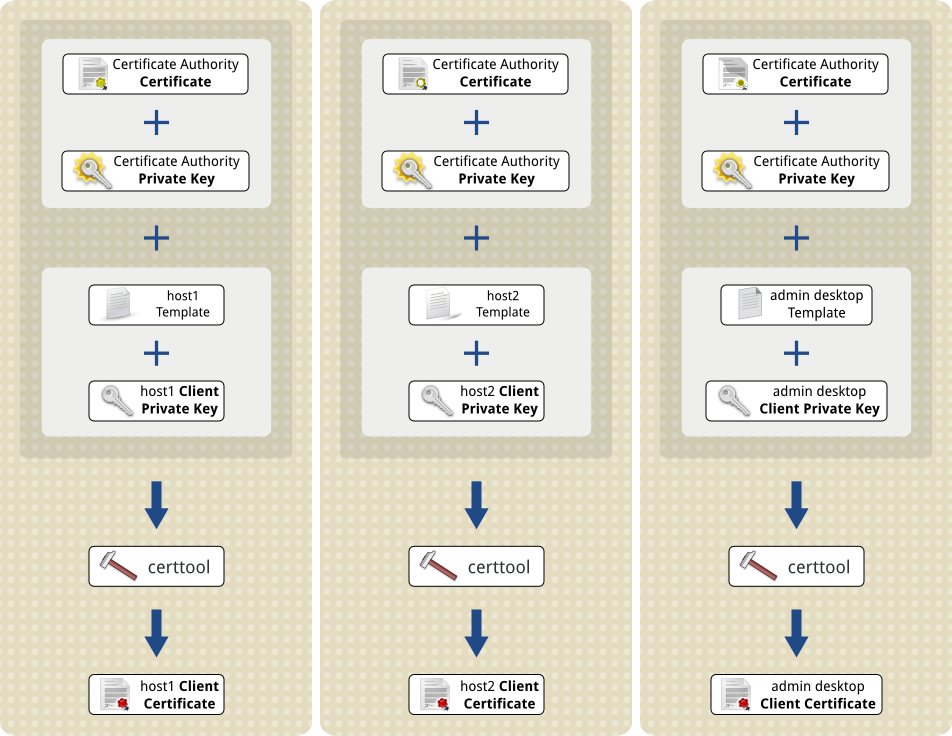
We generate Client Certificates using the template files, along with the corresponding private key files. Also, the Certificate Authority Certificate file is added with its private key, to ensure each new client certificate is signed properly.
For our two virtualisation hosts and the admin desktop, this means:
# certtool --generate-certificate \
           --template host1_client_template.info \
           --load-privkey host1_client_key.pem \
           --load-ca-certificate certificate_authority_certificate.pem \
           --load-ca-privkey certificate_authority_key.pem \
           --outfile host1_client_certificate.pem
Generating a signed certificate...
X.509 Certificate Information:
        Version: 3
        Serial Number (hex): 4c75e08c
        Validity:
                Not Before: Thu Aug 26 03:33:32 UTC 2010
                Not After: Fri Aug 26 03:33:32 UTC 2011
        Subject: C=AU,O=libvirt.org,L=Brisbane,ST=Queensland,CN=host1
        Subject Public Key Algorithm: RSA
                Modulus (bits 2048):
                        a4:73:68:6d:b3:d2:5a:b8:82:78:ad:d7:69:5b:9f:92
                        a8:a1:1c:a7:a3:49:af:5b:a6:20:95:f6:e9:a2:80:88
                        85:a7:fb:72:a4:39:e1:b3:6c:9d:fb:3c:4a:97:02:dd
                        cf:46:e0:72:8a:cd:fc:44:30:d5:f0:b1:65:55:4d:a2
                        e8:7e:0c:c6:38:3d:b1:aa:d8:ff:e4:4e:fe:8a:c7:5e
                        e0:9c:b6:f6:4b:bd:9b:f1:b3:f1:48:b0:60:d8:ef:f4
                        f2:c8:50:94:92:80:54:fc:48:ef:bb:13:69:58:50:9f
                        fb:c9:e0:df:b2:2c:1c:3f:65:fa:d4:58:a5:18:dc:7a
                        12:0c:bc:ef:6f:fd:56:bc:e1:47:20:75:6b:4a:f9:f5
                        a3:b4:ab:ca:07:43:e1:2a:fa:47:2c:9a:ec:97:7c:7f
                        c7:3f:1a:d5:9a:c2:ad:57:5c:52:ed:70:42:8b:8c:a8
                        00:a4:c4:a7:84:56:09:fe:ad:c8:ed:92:70:7a:b2:d7
                        88:e4:36:7a:0f:76:ae:65:fc:e0:9b:29:f7:e3:f4:11
                        5e:b8:56:27:0f:6b:1b:bc:d2:29:3e:82:12:15:7d:e0
                        91:44:4e:6c:eb:e8:ed:92:68:4c:ce:49:d6:67:bc:23
                        fc:f6:18:e9:c1:0d:84:cd:99:36:f2:c9:4f:60:5d:f1
                Exponent (bits 24):
                        01:00:01
        Extensions:
                Basic Constraints (critical):
                        Certificate Authority (CA): FALSE
                Key Purpose (not critical):
                        TLS WWW Client.
                Key Usage (critical):
                        Digital signature.
                        Key encipherment.
                Subject Key Identifier (not critical):
                        20a33ffc7ead1c61ea0890c0c30da0248c8fa80d
                Authority Key Identifier (not critical):
                        9512006c97dbdedbb3232a22cfea6b1341d72d76
Other Information:
        Public Key Id:
                20a33ffc7ead1c61ea0890c0c30da0248c8fa80d


Signing certificate...
Make a note of the highlighted contents of the Subject field in the output. This is the Distinguished Name of the client. It is used in an optional final part of TLS configuration, where access is restricted to only specific clients. So keep a copy of it around until then.
In addition to the displayed output, the certtool command will have created the file host1_client_certificate.pem. This is the TLS Client Certificate file for host1:
# ls -la host1_client_certificate.pem
-rw-r--r--. 1 root root 1233 Aug 26 13:33 host1_client_certificate.pem
We do the same thing for host2, and for the administrative desktop, after adjusting the input and output files names:
# certtool --generate-certificate \
           --template host2_client_template.info \
           --load-privkey host2_client_key.pem \
           --load-ca-certificate certificate_authority_certificate.pem \
           --load-ca-privkey certificate_authority_key.pem \
           --outfile host2_client_certificate.pem
Generating a signed certificate...
X.509 Certificate Information:
        Version: 3
        Serial Number (hex): 4c75e110
        Validity:
                Not Before: Thu Aug 26 03:35:44 UTC 2010
                Not After: Fri Aug 26 03:35:44 UTC 2011
        Subject: C=AU,O=libvirt.org,L=Brisbane,ST=Queensland,CN=host2
        Subject Public Key Algorithm: RSA
                Modulus (bits 2048):
                        ed:74:42:38:0b:37:20:8a:de:0d:44:70:d4:99:d1:ed
                        77:fb:32:b4:6d:3e:bb:8d:9d:4b:dd:65:8c:03:d2:30
                        ec:d6:89:34:b2:e6:fa:cd:ac:a3:a1:6f:b2:ad:dc:45
                        82:95:1a:8e:87:f1:4e:8f:4e:a8:01:b3:8a:3a:e9:74
                        8d:34:6b:4e:3f:fc:a0:10:a2:0e:75:ee:5e:d9:1c:d0
                        ef:d7:c4:79:8f:94:bf:c9:c0:59:a3:56:99:a2:08:2c
                        3d:cb:bf:3c:a8:2a:17:fe:9a:f5:9f:3f:ef:fb:bb:13
                        2c:b5:40:4c:5a:00:e6:1e:86:07:73:ae:2a:1d:72:79
                        8e:9c:5e:8b:a8:2a:ea:eb:4d:f3:19:f3:62:32:9f:99
                        f0:2f:e1:1a:52:bb:32:47:7e:1d:b3:82:30:18:66:d2
                        56:a9:38:23:88:64:2b:84:89:f9:0a:9a:b4:71:49:58
                        22:ef:e3:47:44:40:ad:28:2c:77:5a:18:92:5e:4d:5f
                        74:a9:92:92:d8:df:44:d6:b2:83:77:da:1b:63:98:66
                        ce:57:89:bd:95:51:12:f7:43:bb:1c:1d:7f:87:4f:69
                        3b:34:90:6e:d7:ff:df:1b:cd:49:72:ad:b6:42:8a:2d
                        45:03:f0:d0:f8:68:e4:86:1b:8b:9c:58:be:4a:b6:95
                Exponent (bits 24):
                        01:00:01
        Extensions:
                Basic Constraints (critical):
                        Certificate Authority (CA): FALSE
                Key Purpose (not critical):
                        TLS WWW Client.
                Key Usage (critical):
                        Digital signature.
                        Key encipherment.
                Subject Key Identifier (not critical):
                        3aa582550543cd4de72f22ca791600a04d2c0dbb
                Authority Key Identifier (not critical):
                        9512006c97dbdedbb3232a22cfea6b1341d72d76
Other Information:
        Public Key Id:
                3aa582550543cd4de72f22ca791600a04d2c0dbb


Signing certificate...
# certtool --generate-certificate \
           --template admin_desktop_client_template.info \
           --load-privkey admin_desktop_client_key.pem \
           --load-ca-certificate certificate_authority_certificate.pem \
           --load-ca-privkey certificate_authority_key.pem \
           --outfile admin_desktop_client_certificate.pem
Generating a signed certificate...
X.509 Certificate Information:
        Version: 3
        Serial Number (hex): 4c75e1d8
        Validity:
                Not Before: Thu Aug 26 03:39:04 UTC 2010
                Not After: Fri Aug 26 03:39:04 UTC 2011
        Subject: C=AU,O=libvirt.org,L=Brisbane,ST=Queensland,CN=admindesktop
        Subject Public Key Algorithm: RSA
                Modulus (bits 2048):
                        d4:f3:23:dc:15:9e:f6:0f:ab:fe:77:5e:dc:72:a2:4d
                        e3:36:a0:cd:6c:47:b7:8a:f0:19:3c:fd:72:da:9e:56
                        41:a7:2e:e2:14:87:b8:14:79:2c:e1:20:64:63:ca:91
                        05:69:9c:9c:7e:db:d4:50:3f:82:90:df:b9:d8:87:85
                        a4:12:55:a2:34:42:19:5e:e0:1a:78:f4:c7:82:2c:a1
                        0b:cd:22:98:cd:c0:35:d9:8f:c0:db:7e:8f:6c:9b:52
                        ec:82:af:97:3f:71:5e:9e:d5:9c:fd:02:9b:c8:5f:67
                        bc:ba:37:99:0b:2d:0e:91:c9:c0:21:92:e6:3f:84:7e
                        c7:b3:b8:16:d3:85:bd:69:73:a2:a5:f2:d5:95:79:79
                        9f:64:ad:36:24:94:a2:2b:1c:24:7e:19:23:ba:33:b7
                        29:c6:f2:ea:84:46:16:c4:95:ad:f9:a1:ab:35:15:62
                        3c:27:d7:b6:4a:dd:13:dc:1e:b4:00:f2:a0:01:12:38
                        a1:03:4e:24:bf:ac:eb:58:87:46:51:56:dd:ce:e2:10
                        02:16:a6:9f:e7:ae:e3:b8:35:5c:7e:11:59:e8:02:e6
                        2d:13:7e:fa:64:b7:8f:16:07:df:a9:f3:12:a7:dc:de
                        81:8b:b1:56:aa:dd:72:18:75:73:23:c8:5e:df:48:31
                Exponent (bits 24):
                        01:00:01
        Extensions:
                Basic Constraints (critical):
                        Certificate Authority (CA): FALSE
                Key Purpose (not critical):
                        TLS WWW Client.
                Key Usage (critical):
                        Digital signature.
                        Key encipherment.
                Subject Key Identifier (not critical):
                        93a5c2f0b48351e6043bf4d7a62a3a0b458b70f2
                Authority Key Identifier (not critical):
                        9512006c97dbdedbb3232a22cfea6b1341d72d76
Other Information:
        Public Key Id:
                93a5c2f0b48351e6043bf4d7a62a3a0b458b70f2


Signing certificate...
This will have created the TLS Client Certificate files, host2_client_certificate.pem for host2, and admin_desktop_client_certificate.pem for the admin desktop:
# ls -al *client_certificate.pem
-rw-r--r--. 1 root root 1245 Aug 26 13:39 admin_desktop_client_certificate.pem
-rw-r--r--. 1 root root 1233 Aug 26 13:33 host1_client_certificate.pem
-rw-r--r--. 1 root root 1233 Aug 26 13:35 host2_client_certificate.pem
The template files are no longer needed, so can be discarded

# rm host1_client_template.info host2_client_template.info admin_desktop_client_template.info
Moving the Certificates into place
Now the Client Certificates have been created, they need to be transferred to each of the virtualisation hosts and the admin client.
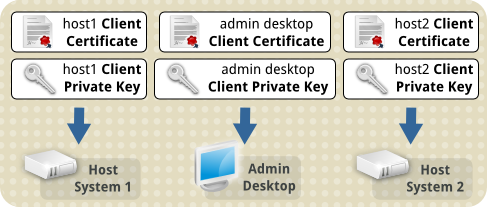
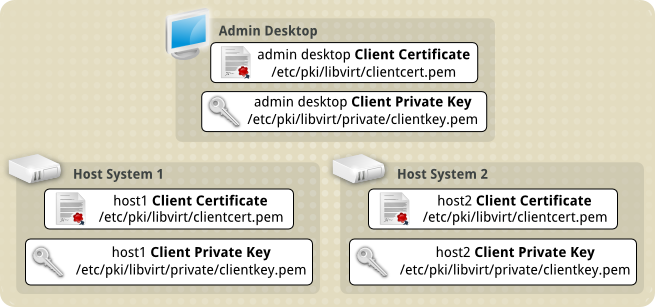
The default location the libvirt daemon looks for the Client Certificate file is /etc/pki/libvirt/clientcert.pem. The private key to match this needs to be in /etc/pki/libvirt/private/clientkey.pem.
The private key file should be kept secure, with only the root user able to access it in any way. The client certificate file is not as sensitive.
Ownership and permissions
Reasonable ownership, permissions, and SELinux labelling for these two files are:
Client Certificate path: /etc/pki/libvirt/clientcert.pem
Ownership: root:root
Permissions: u=r,g=,o= (400)
SELinux label: system_u:object_r:cert_t:s0
Private Key for Client Certificate: /etc/pki/libvirt/private/clientkey.pem
Ownership: root:root
Permissions: u=r,g=,o= (400)
SELinux label: system_u:object_r:cert_t:s0
The SELinux label is only relevant if the server or desktop has SELinux enabled. It can be ignored otherwise.
You should take into account your site security practices and requirements, as they may need things to be done differently.
Transferring the files and setting them up
In the example below, we use the utility scp to transfer the certificate and key to each virtualisation client. We then log in directly to each host to move the files into place and set their permissions accordingly.
Transferring the files to host1
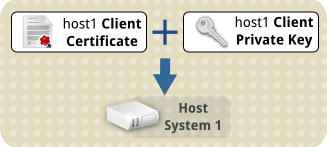
Notice the filenames are being changed in the transfer
# scp -p host1_client_certificate.pem someuser@host1:clientcert.pem
someuser@host1's password:
host1_client_certificate.pem           100% 1164     1.4KB/s   00:00
# scp -p host1_client_key.pem someuser@host1:clientkey.pem
someuser@host1's password:
host1_client_key.pem                   100% 1675     1.7KB/s   00:00
Logged into host1
We move the files into place and set their permissions:
$ sudo mv clientcert.pem /etc/pki/libvirt
$ sudo mv clientkey.pem /etc/pki/libvirt/private
$ sudo chmod 400 /etc/pki/libvirt/clientcert.pem /etc/pki/libvirt/private/clientkey.pem
If SELinux is enabled, then update the labels as well:
$ sudo restorecon /etc/pki/libvirt/clientcert.pem /etc/pki/libvirt/private/clientkey.pem
$ ls -laZ /etc/pki/libvirt
/etc/pki/libvirt:
total 20
drwxr-xr-x  3 root root system_u:object_r:cert_t:s0 .
drwxr-xr-x. 8 root root system_u:object_r:cert_t:s0 ..
-r--------. 1 root root system_u:object_r:cert_t:s0 clientcert.pem
drwx------  2 root root system_u:object_r:cert_t:s0 private
-r--------. 1 root root system_u:object_r:cert_t:s0 servercert.pem
$ sudo ls -laZ /etc/pki/libvirt/private/
/etc/pki/libvirt/private/:
total 16
drwx------  2 root root system_u:object_r:cert_t:s0 .
drwxr-xr-x  3 root root system_u:object_r:cert_t:s0 ..
-r--------. 1 root root system_u:object_r:cert_t:s0 clientkey.pem
-r--------. 1 root root system_u:object_r:cert_t:s0 serverkey.pem
Transferring the files to host2
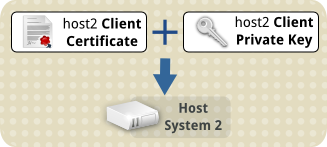
Notice the filenames are being changed in the transfer
# scp -p host2_client_certificate.pem someuser@host2:clientcert.pem
someuser@host2's password:
host2_client_certificate.pem           100% 1164     1.2KB/s   00:00
# scp -p host2_client_key.pem someuser@host2:clientkey.pem
someuser@host2's password:
host2_client_key.pem                   100% 1675     1.1KB/s   00:00
Logged into host2
We move the files into place and set their permissions:
$ sudo mv clientcert.pem /etc/pki/libvirt
$ sudo mv clientkey.pem /etc/pki/libvirt/private
$ sudo chmod 400 /etc/pki/libvirt/clientcert.pem /etc/pki/libvirt/private/clientkey.pem
If SELinux is enabled, then update the labels as well:
$ sudo restorecon /etc/pki/libvirt/clientcert.pem /etc/pki/libvirt/private/clientkey.pem
$ ls -laZ /etc/pki/libvirt
/etc/pki/libvirt:
total 20
drwxr-xr-x  3 root root system_u:object_r:cert_t:s0 .
drwxr-xr-x. 8 root root system_u:object_r:cert_t:s0 ..
-r--------. 1 root root system_u:object_r:cert_t:s0 clientcert.pem
drwx------  2 root root system_u:object_r:cert_t:s0 private
-r--------. 1 root root system_u:object_r:cert_t:s0 servercert.pem
$ sudo ls -laZ /etc/pki/libvirt/private/
/etc/pki/libvirt/private/:
total 16
drwx------  2 root root system_u:object_r:cert_t:s0 .
drwxr-xr-x  3 root root system_u:object_r:cert_t:s0 ..
-r--------. 1 root root system_u:object_r:cert_t:s0 clientkey.pem
-r--------. 1 root root system_u:object_r:cert_t:s0 serverkey.pem
Transferring the files to the administrative desktop

Notice the filenames are being changed in the transfer
# scp -p admin_desktop_client_certificate.pem someuser@admindesktop:clientcert.pem
someuser@admindesktop's password:
admin_desktop_client_certificate.pem   100% 1164     1.1KB/s   00:00
# scp -p admin_desktop_client_key.pem someuser@admindesktop:clientkey.pem
someuser@admindesktop's password:
admin_desktop_client_key.pem           100% 1675     1.6KB/s   00:00
Logged into the administrative desktop
We move the files into place and set their permissions:
$ sudo mv clientcert.pem /etc/pki/libvirt
$ sudo mv clientkey.pem /etc/pki/libvirt/private
$ sudo chmod 400 /etc/pki/libvirt/clientcert.pem /etc/pki/libvirt/private/clientkey.pem
If SELinux is enabled, then update the labels as well:
$ sudo restorecon /etc/pki/libvirt/clientcert.pem /etc/pki/libvirt/private/clientkey.pem
$ ls -laZ /etc/pki/libvirt
/etc/pki/libvirt:
total 20
drwxr-xr-x  3 root root system_u:object_r:cert_t:s0 .
drwxr-xr-x. 8 root root system_u:object_r:cert_t:s0 ..
-r--------. 1 root root system_u:object_r:cert_t:s0 clientcert.pem
drwx------  2 root root system_u:object_r:cert_t:s0 private
$ sudo ls -laZ /etc/pki/libvirt/private/
/etc/pki/libvirt/private/:
total 16
drwx------  2 root root system_u:object_r:cert_t:s0 .
drwxr-xr-x  3 root root system_u:object_r:cert_t:s0 ..
-r--------. 1 root root system_u:object_r:cert_t:s0 clientkey.pem
Full list of steps
Create the Client Certificates - this page
